
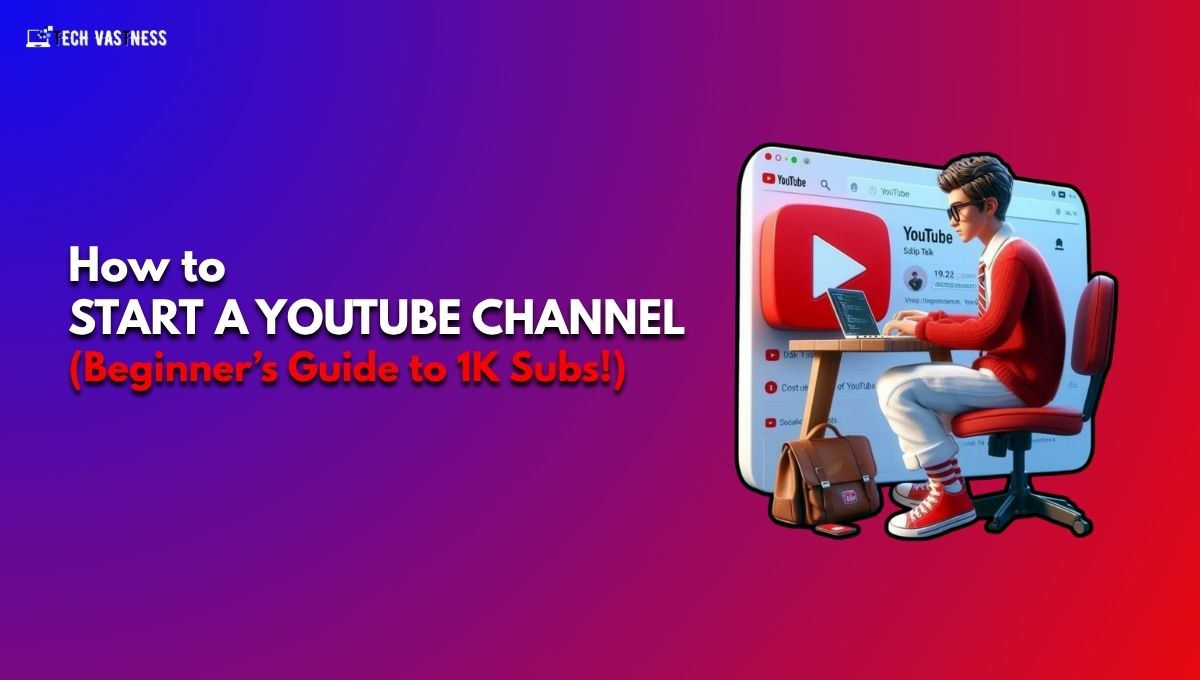
Take steps to become a successful YouTuber: Start your own YouTube channel. Here you will find all the advice, tips, and inspiration you need.
YouTube is one of the most popular websites in the world, so if you’re looking to start your own YouTube channel, that’s a good idea. You’ll find communities of watchers and creators on every platform, whether it’s business, travel, or media. But before you gain a thousand subscribers, you’ll need to know how to start a YouTube channel to be successful.
This guide will give you step-by-step instructions on how to create a YouTube channel. Whether you want to grow your brand or create a revenue stream, YouTube offers countless opportunities. You’ll learn how to start a YouTube channel and get your first 1,000 subscribers—even if you’re a complete beginner.
Let’s get started!
How to start a YouTube channel
If you have a Google account, it means you already have a YouTube account, so you can watch videos, like them, and subscribe to channels. You need to create a channel associated with your account to publish your videos. You can create a personal or business channel.
Read Also: Best Way to Make Money from Home–Start Today with $0!
1. Create a personal YouTube channel
If you already have a Google account (for example, Gmail), then you already have a YouTube account. Avoid using your personal Google account when creating your YouTube channel. Create a new Gmail account.
You can create a new Google account by doing the following:
1. Go to https://www.youtube.com/
2. You click your profile picture in the top right corner.
3. Select “Change account”, then select “Add account”
4. Select “Create account.”
Next, follow all the steps to create a new Google account.
Now that you have a new Google account to use for your new YouTube channel, follow these steps:
1. Sign in to YouTube.
2. You then click on your profile photo in the top right corner.
3. Click “Create Channel.”
4. Select “Name” (this is your displayed name on YouTube) and “Handle” (this is your channel’s URL).
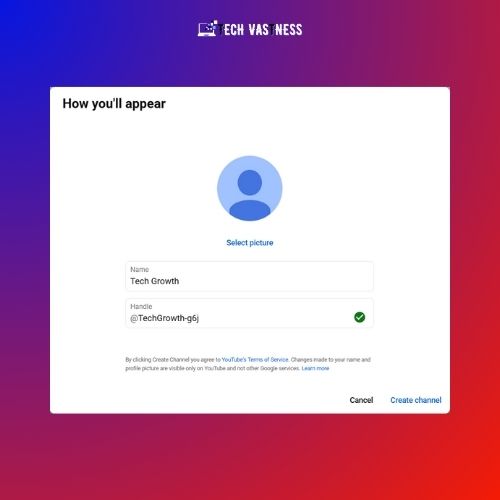
5. Click Create Channel.
It will take a few minutes for your channel to be ready. Once it is prepared, you can view it on YouTube by clicking “Your Channel” in the left sidebar.
2. Create a business YouTube channel
Business channels have more than one manager or owner. If you have a brand account, you can link it to your branch account.
1. Sign in to YouTube.
2. Go to your channel list.
3. You create a channel by clicking “Create a new channel”.
4. To create a channel for a brand account, select that brand account from the list.
5. Fill in your channel details.
6. Click “Create“.
Also, read YouTube’s guidelines on adding or managing multiple owners on a business YouTube channel.
Read Also: How Do Bloggers Make Money? From $0 to Full-Time Income
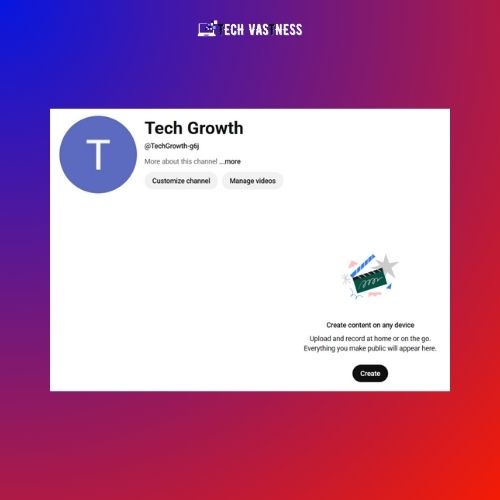
Customizing your YouTube channel
Now that your channel is created, you have to customize it. Now, you need to verify the channel, add a profile photo, upload a banner image, and write a channel description. Let’s understand each step in detail:
Verify your YouTube channel
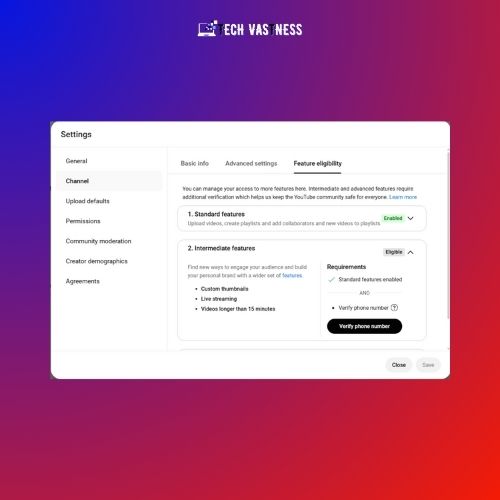
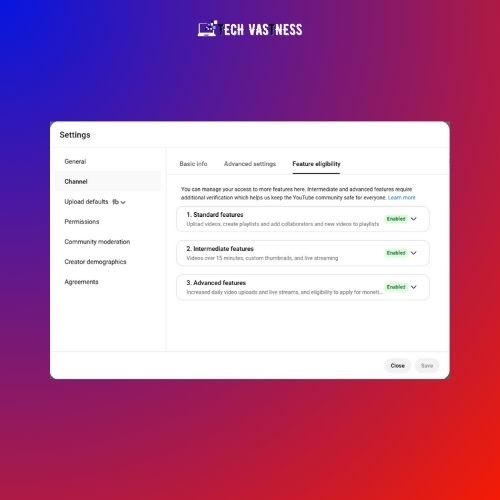
By verifying your YouTube channel, you can upload videos longer than 15 minutes, create thumbnails with Canva, live stream, and request Content ID whenever you want. To verify your channel, you need a mobile with an active number. Because the otp will come on it.
- Click your channel’s profile photo in the top right corner, then select YouTube Studio.
- Click Settings, then go to the Channel tab.
- Choose Feature eligibility, then click the drop-down menu for Intermediate features.
- Select Verify phone number.
- Follow the instructions to verify your phone number.
Advance Features
It is necessary to enable the advanced feature because you can live stream. Your monetization will happen only when the third feature is enabled. If there is no copyright issue in your content, then this feature gets enabled automatically. My third feature got enabled automatically.
However, you have three options to enable this feature.
- Video Verification
- Valid ID
- Channel History
You have to click on Access Feature. Now you have to click on “tech a photo of your ID“. You have to verify with PAN ID or Voter ID. Click on Next, and now click on Get Gmail. Now, click on Done.
Now you will receive an email on the Gmail account with which you have created your channel. You have to open that mail. Now you have to click on Start Verification. Now you have to write the date of birth on your PAN card. Now click on Next. Scroll down and click Next. Then you click Next. The camera will open, and you have to click a photo of your ID and submit it. Now your verification will be done in a few minutes or hours.
Add a channel profile photo and banner image
Branding your YouTube channel is important because it makes it easier for people to find your channel. If you haven’t uploaded a profile photo when you created your channel, you should upload one. For a YouTube channel, your profile size should be 800 x 800 pixels and in JPG or PNG format. You can create it for free with Canva.
Also, you can upload a banner image. Banner images appear at the top of the channel’s home page. These will render differently depending on the device, so the app must select an image formatted for mobile, computer, and TV. To create your banner on Canva, the recommended size for a banner image is 2048 x 1152 pixels with an aspect ratio of 16:9.
- In YouTube Studio, choose Customization.
- You click on the Branding tab, and next to Picture, click Upload.
- Select from your device.
- Right below the picture, you will see the banner image.
- Click on Upload and select a photo from your device.
- Now that you are done, click on Publish.

Write a channel description
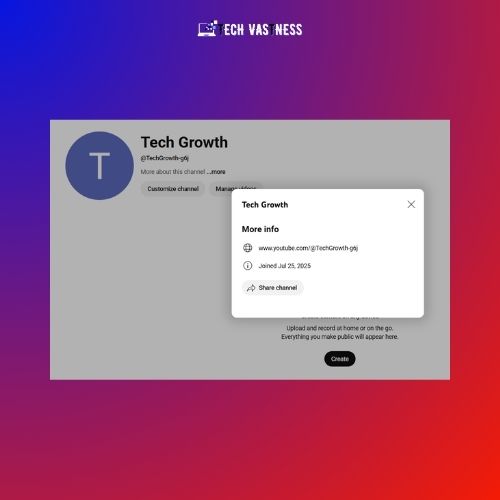
Your channel description is found in your “About” section. The first few words of your description appear on your channel’s home page, below your channel. Users can click on it to read the full description of what they’ll find on this channel.
Your channel description should explain what kind of videos you upload and who they are for. You can also include information about yourself.
Go to your YouTube Studio.
Select “Customization” and then “Profile.”
Add your description.
When all you’re done, click “Publish.”
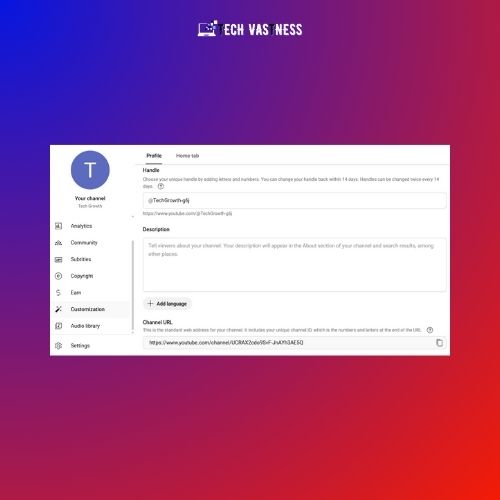
If you want to add links to your about section, you should add them to the links, not your description. You’ll find the links on the “Profile” tab, below the “Channel URL.”
Read Also: How to Google Alerts Set Up in 4 Simple Steps!
4. Recording and publishing your first video
Now that your channel is set up, you can start planning, recording, editing, and uploading your videos. Now, if you want to be successful on YouTube, everyone wants to. What is your subject? Before you start recording, you should have a plan for each video.
Plan your content
You select a niche, then figure out your audience, think about your goals, and look at some competitors to create your YouTube videos. Let’s understand each one in detail:
- Select a niche: Select a niche and stick to it. Attract an audience interested in your subject and create engaging videos that will keep them invested. You can choose categories for your YouTube channel like technology, makeup and beauty, cooking, fitness, pets and animals, health, finance, business, and more.
- Find your audience: Think about the person who will be watching your videos – how old they are, what their needs are, where they live, how they spend their free time, and what kinds of questions they might ask you if you were to talk to them. Now you need to know who they are if you want to create helpful content.
- Consider your goals: What are your reasons for starting a YouTube channel? Take some time to think about your video goals and write them down. When you know what you want to achieve, it will be much easier to plan your content.
- Study your competitors: Whichever niche you choose, you will already have existing channels to compete with. This doesn’t mean you have to compete with them for views; look at other YouTube channels for inspiration. Compare your content to theirs and see what’s working and what’s not.
Use a familiar video structure
Most of the videos on your YouTube channel should look and feel similar. Try to keep them the same length, give them a similar structure, and use background music.
Choose the length of your video: Videos that are about 10 minutes long perform best on YouTube. However, longer or shorter videos also perform well, depending on the content of the video. Remember that videos up to 60 minutes long can be published as short videos on YouTube. Take my short video, for example. It is in vertical (portrait) orientation.
Give your video structure: Format your YouTube video with an intro, middle, & conclusion. Most videos on YouTube are created in a way that people can become familiar with them. Your intro is where you grab your people’s attention and encourage them to keep watching. At the end of your video, wrap up what you’ve covered and include your call to action.
Add background music to your videos: For most specific subjects on YouTube, background music is a great addition. However, make sure you use copyright-free music from the YouTube Audio Library or a free platform so YouTube doesn’t flag you. You can also pay for a license for royalty-free music.
Get the right equipment
You can record your videos on your mobile phone, but if you want the best quality, you need a camera, a microphone, lights, an external hard drive, and video editing software. I would suggest starting with your mobile phone if you can’t afford to spend a lot of money getting started.
Good audio is more important than good video, as low audio quality can be distracting to the audience. You can get a cheap mic from Amazon to get started (Like Boya Mic). Lighting is also a great way to improve video quality.
Read Also: How to Become Freelance Digital Marketer & Find Projects
Upload and publish the video
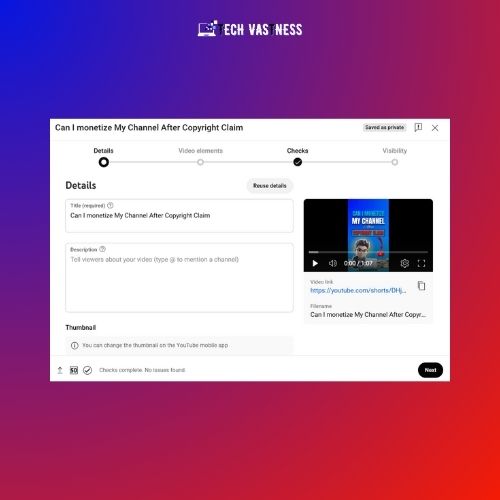
Now that you’ve recorded and edited your first video, it’s time to upload it. There are several settings to consider when uploading new videos to your channel.
- Now, click the blue “Select files” button to add files from your device.
- Depending on the size of your file, uploading may take a few minutes, but this also depends on your internet speed.
- Now give your video a Title and Description.
- You can choose a Thumbnail from the video file or upload a thumbnail created with Canva.
- Unless your channel creates content specifically for kids, select “No, it’s not made for kids” in the “Audience” section.
- Click “Show more” to see more settings.
- You can manually include chapters by typing a timestamp and title in your video’s description. If you don’t, you can simply activate “Automatic chapters“.
- Add tags to your video. Note that these tags are not the same as hashtags. On a YouTube channel, you can include hashtags (formatted as #hashtag) in your description.
- Select a category for the video that applies to your channel.
- Review the remaining settings and click “Next” when you are finished.
- Now, click the “Create” icon in the top right corner of the YouTube channel. Then, click “Upload Videos.”
Pro Tip: Whenever you upload a video, save it in your gallery with the name of your video title. When it is uploaded, it will be uploaded with the name of your title, which is a good signal for search engines.
- On the next screen, you’ll now see the options for end screens and cards. Make sure to turn on end screens if you want YouTube to suggest more videos from your channel at the end of each video. And cards allow you to include links to videos, playlists, and channels at any time during your video.
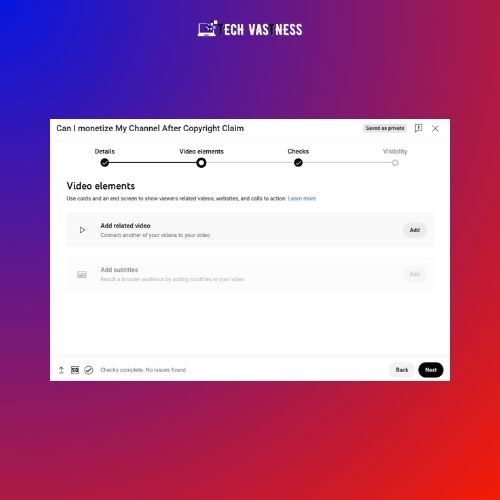
- Now, after you see the end screen and cards, click “Next“.
- Ensure your video has no copyright issues, then click “Next“.
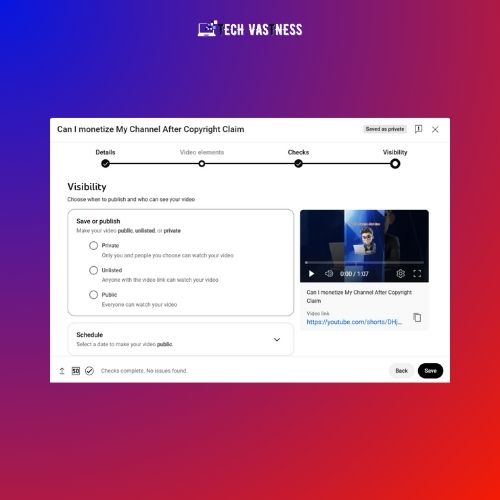
- Choose the audience for your video: private, unlisted, or public. After you select unlisted, select Publish your video later.
- You can also schedule your video to be published at a later time and date. I regularly upload my video at 4 PM in India.
- When all your settings are completed, click “Save“.
Do live videos
We learned how to start YouTube channel. Now, after publishing a video, you can begin a live broadcast on your YouTube channel. Live broadcasting on YouTube allows you to connect with your audience who may not be able to make regular videos. You can chat with your audience, answer their questions, or ask them questions. If you don’t want to limit your live stream to YouTube, you can expand your reach with multistreaming, streaming on multiple platforms at once.
Read Also: How to Make Money Online for Beginners? Top 20 Ways
Tips for Starting a YouTube Channel
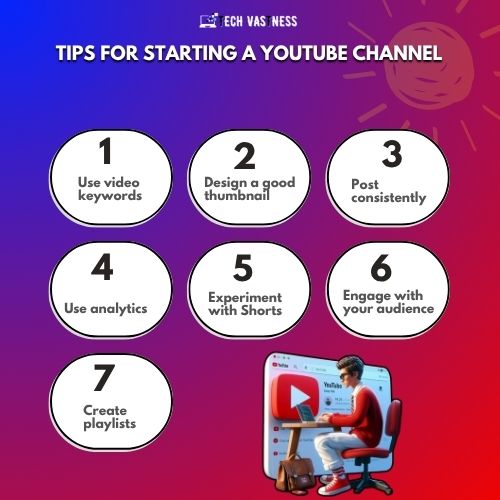
Starting and running your channel is a big accomplishment. When publishing new videos, keep these tips in mind.
1. Use video keywords
YouTube is a video hosting platform, but it is also a search engine platform. Search for your topic idea on YouTube and see how popular it1l1 is or if there are already many videos on it. When you find a good keyword, try to optimize your video for it.
Include the keyword in your video title and include it in the first sentence of your description. Your video descriptions should also grab people’s attention immediately, as the first one or two sentences are the only things that appear in search results.
For example, the technology-based YouTube channel “Technical Guruji” provides information about smartphone reviews, tech news, and gadgets. Most of the video titles include keywords like “unboxing,” “review,” or “tech news” because the channel targets a tech-related audience. For this reason, it is easily found in search and is also beneficial for SEO.
2. Design a good thumbnail
While the custom thumbnail option is available, ensure you design a good one. It’s free on Canva, as I mentioned above! The thumbnail is the first impression viewers get of your video, so it should stand out and be something people click on right away. Thumbnails with large text (like Anton font), simple images, or bright backgrounds are the ones that attract the most attention in search results.
Avoid using the thumbnails YouTube suggests to you after you upload your video, as these images will never attract as much attention as the ones you can design yourself.
3. Post consistently
People who consistently and on time upload content to their channels do well on YouTube, while those who don’t fall behind. To reach the largest audience, schedule your videos every week and at the right time of day.
You don’t need to upload a new video every day, but you have to maintain quality. Aim to upload a video at least once or twice a week. Whenever you upload a new video, be sure to promote it on your social media channels.
The YouTube channel 5-Minute Crafts uploads 1 to 3 new videos per day. Some videos are short, around 10 minutes, but few are over an hour long.
4. Use analytics
It’s also essential to become familiar with YouTube analytics, allowing you to track the performance of your videos. In particular, you should pay attention to your click-through rate, which is the percentage of viewers who click on your video after viewing your thumbnail.
You should also keep an eye on watch time, which is the average time viewers spend watching your video. YouTube’s algorithm prefers videos with longer watch times, but you don’t necessarily need to make your videos long. Instead, focus on making your videos engaging and helpful enough to keep people watching.
5. Experiment with Shorts
Shorts are videos on YouTube that are 60 seconds or less in length. They are optimized for mobile phone audiences, so they are displayed in vertical (portrait) mode. Think of Shorts as YouTube’s version of Instagram Reels, Snapchat, or TikTok.
Making shorts in addition to longer videos can add variety to your content and make it more likely for people to discover your channel. Before you spend hours creating long videos, try out short video ideas like I did.
6. Engage with your audience
YouTube isn’t just a video hosting platform; it’s also a social network. People can like and comment on videos, as well as subscribe to your channel. Make sure to remind your viewers somewhere in your video that they can like and subscribe.
Include CTAs in your videos and descriptions to get people to comment, then respond to those comments as quickly as possible. People appreciate it more when you answer their questions or take the time to connect with them. They’re more likely to come back to your channel to watch more of your channel content.
7. Create playlists
Once you have enough published videos on your YouTube channel. Now, you should organize them into playlists. You can show these playlists on your YouTube channel’s home page, as well as link to them in your video descriptions, cards, & end screens.
YouTube rewards channels that keep their audience on YouTube. When an audience finishes watching a video in a playlist, the next channel video in the list will automatically play. This increases the likelihood that the audience will stay on your YouTube channel.
Read Also: How to Become Digital Marketer? Step-By-Step Guide!
Bonus: How Long Does It Take to Reach 1,000 Subs?
One of the most common questions new YouTubers ask is:
“How long will it take to get 1,000 subscribers?”
The honest answer? It depends. But let’s break it down with realistic expectations, common mistakes to avoid, and real-world tips from creators who’ve been there.
Realistic Timeline (What to Expect)
There’s no fixed formula, but here are some average timelines based on real creator journeys:
- Fast Growth (1–3 Months):
Possible if you create viral or trending content, focus heavily on YouTube SEO, and promote your videos smartly.
Example: Some creators in niches like tech unboxing, news commentary, or viral shorts have hit 1K in under 60 days. - Moderate Growth (4–8 Months):
This is the most common path. You upload consistently, slowly build an audience, and start seeing subscriber momentum over time. - Slow but Steady (9–12+ Months):
Some channels take a year or more to hit 1K — and that’s totally okay. It often depends on your niche, how often you post, and your ability to learn and adapt.
🎯 Pro Tip: Focus on improving your average views per video rather than obsessing over subscriber count. Subscribers follow value, not just videos.
❌ Common Mistakes to Avoid
Here are some beginner traps that can slow down your growth to 1,000 subs:
- Inconsistent Uploading:
Posting once a month won’t cut it. Aim for 1–2 videos per week (even if they’re simple). - Ignoring Thumbnails & Titles:
Your content might be great, but if your thumbnail doesn’t grab attention, people won’t click. - Not Optimizing for Search:
Skipping SEO means your videos won’t be found. Use tools such as TubeBuddy or VidIQ to research keywords and tags. - Chasing Too Many Trends:
Jumping on every trend without building your niche identity can confuse your audience. - Giving Up Too Early:
Many creators quit at 100–200 subs. The first few months are the hardest — keep going.
✅ Final Thoughts
Reaching your first 1,000 subscribers on YouTube isn’t just about luck — it’s about consistency, learning, and providing real value. Some get there fast, some take a year — but if you stick with it, you will get there.
Your first 1K is the hardest. The next 10K will come faster.
So keep showing up, keep creating, and most importantly… enjoy the process.
Read Also: How to Make Money in Digital Marketing? 13 Greatest Ways!
Wrap Up on How to Start a YouTube Channel
How to start a YouTube Channel, we have learned. Creating a YouTube channel is so easy; you can do it in a few steps. Building a strong, successful YouTube channel, on the other hand, takes some work. Take inspiration from your favorite YouTube channels and YouTubers, but always remember that they put in a lot of work to get where they are now. With patience, little effort, and all the important tips we’ve shared with you above, you can achieve your goal with your good work.
Read More Blogs:
- What is SEO in Digital Marketing? Your Step-by-Step Explained!
- What is Off-Page SEO Techniques? 17 Best Methods!
- What is Off-Page SEO Optimization? Helpful Strategies!
- What is Local SEO Optimization? Improve Your Local Rankings!
- What is Technical SEO Audit? Beginner’s Successful Guide